Thursday, June 27, 2024

Tutti Frutti Cuties


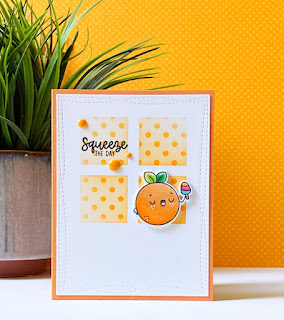
Hello Friends and welcome!  I have a fun set of cards to share with you today featuring the super cute set “Tutti Frutti” from Taylored Expressions.  These cards were so fun to make!  In addition to the stamp set, I used several fun stencil also from Taylored Expressions.  

Taylored Expressions: Tutti Frutti stamp set; Square Windows mask; Mini Slim Stencils: Candy Cane Stripe, On the Dot, and Wonky Dots.

To start, I layered the square window stencil and ink blended using Distress Inks. I kept the mask in place and placed the second mask (mini slim stencil) over the same area and again ink blended using Distress Inks.  I next die cut the panels using Wonky Stitched Rectangles from MFT’s.  I then stamped, die cut, and Copic colored these fun Frutti’s.  Once all the coloring was complete I was ready to assemble my cards together using a similar shade of cardstock paper that matched the ink blending. To add a little more interest to each card, I adhered several enamel dots around the stamped sentiments. 

Thanks so much for stopping by and I hope these “Tutti Frutti” cuties inspired you!  Take care!


Thursday, April 25, 2024

Blue Daisies

Blue Daisies…
 

Hello friends and welcome!  Today’s post is a double feature…two cards for the price of one! lol πŸ˜‚ 

   This first card features the “Daisy Background Stencil” and the “Sweet Daisy Die” both from Waffleflower Crafts.  This stencil is a two step stencil set.  I placed stencil #1 over a trimmed piece of Neenah solar white cardstock and ink blended the area using inks from The Stamp Market. Supplies will be listed at the end of the post.  I repeated the process for stencil #2.  Next, I die cut the Waffleflower Crafts “Pinking Circle Frames Die” from the coordinating cardstock.  In addition to the circle die, I die cut the pieces from the Daisy also using coordinating cardstock.  I then stamped the sentiment and white heat embossed.  After assembly the pieces onto the background and adhering, I added a few white dots the the flower using a white gel pen as well as adhering a few clear drops.


For the second card, I repeated the process of ink blending over the Daisy stencil but this time I die cut the middle of the background using the Waffleflower Crafts “Organic Frame Die”.  For the sentiment, I hot foiled the “Hello Spring foil plate” onto a piece of coordinating cardstock.  I then die cut several blooms from the “Organic Frame Die” and adhered to the background before assembling items and adhering to card base.  For an extra detail, I added a few yellow enamel dots to the blooms.

Thanks so much for stopping by!…wishing everyone a lovely day…take care!

Supplies:

Waffleflower Crafts: Daisy background stencil, organic frame die, hello spring foil plate, sweet Daisy die, pinking circle frames die 

The Stamp Market: inks and cardstock: poolside, waterfall, sunshine, and cactus

Spellbinders Glimmer Machine and gold foil

Neenah Solar White cardstock 110lb.

MFT’s: double stitched rectangles 

Hero Arts white embossing powder

Taylored Expressions: clear drip drops

Thursday, March 14, 2024

Sunshine and Rainbows


“Sunshine and Rainbows and Paper Crafts…these are a few of my favorite things” πŸŽΆπŸŽ΅πŸŽΆπŸ˜„

   Hello Friends and welcome!  I think it’s been more than a minute since my last post lol 🀣 but I’m so glad to be sharing this fun project with you today featuring a few Taylored Expressions products including stencils, stamps, and die cuts.  This trio of products are the “Make a Rainbow” stencil, “Over the Rainbow” sentiments, and “Rainbow Cloud duo”.

  To start, I placed the stencil over a piece of Neenah solar white and ink blended using several The Stamp Market inks including salmon, melon, sunshine, and apple.  Once the rainbow was ink blended, I took Salvaged Patina Distress ink and lightly ink blended the sides blending the ink toward the rainbow image.  I then stamped several images and sentiment using Pinkfresh Studio warm buff dye ink.  For the clouds, I die cut them using Lawn Fawn pixie dust cardstock.  Don’t you just love mixing and matching different products from different companies to create with?! πŸ˜„πŸ‘πŸ» To add a little more detail to the card, I die cut the panel using MFT’s wonky stitched rectangles before adhering the clouds and heart to the panel, then adhering the panel to a Neenah desert storm card base.  

  Thanks so much Friends for stopping by…Hope this card inspires you to find your inner Rainbows!…take care!